How to Draw a Rose
In this drawing lesson we want to show you how to draw a rose step by step. While the final result will be quite realistic, the rose drawing lesson itself will be quite simple, and even a novice artist can handle it.
For this lesson on how to draw a rose, you will need a pencil, paper, eraser and colored pencils, paints or felt-tip pens to color the final result.
Rose Drawing Tutorial

Drawing flowers, like other plants, is one of the most important skills for any artist, especially for someone who wants to learn how to draw still lifes.
In addition, the ability to draw flowers will help the artist in drawing other genres, such as landscape and even portrait. You may need to draw flowering meadows or a girl with a beautiful rose woven into her hair.
Drawing flowers, just like creating any other work in the genre of fine art, requires a competent step-by-step approach. First you must outline the subject with general and rough lines, then gradually draw out the details until you have a complete drawing.
Time needed: 50 minutes
How to Draw a Rose
- Outline the rosebud.
Using very light but clear lines sketch the outlines of the rosebud. Do not try to make everything too perfect and polished, remember that this is just a sketch.

- Outline the stem of the flow.
Rough and light lines are also used at this stage. The stem of a rose can have the most bizarre shapes. You can repeat the shape as in our example.

- Sketch the leaves of the beautiful flower.
Please note that we are not using smooth lines yet, this is useless for now. Here we need to designate the location, the shape and the number of rose leaves.

- Sketch out the location of the petals.
Rose petals diverge from the central part to the edges in the form of a spiral. In the central part, the petals should be noticeably smaller than on the outskirts of the bud.

- Draw the central part of the bud in detail.
It’s time to get down to details. Start from the center of the bud, carefully drawing the petals. Note that the farther from the center, the larger the rose petals become.

- Detail larger petals.
Continuing to draw the petals, make them bigger and bigger. Each next layer of petals should hug the previous one. Try to give the petals a varied look.

- Detail the outer petals.
These are the largest petals. Please note that the outlines of the petals should be wavy and uneven. This gives the rose drawing a more realistic and natural look.

- Draw the stem of the rose in more detail.
Using clearer and smoother lines draw the stem of the rose, not forgetting the thorns. This detail will also give the rose drawing a more natural look.

- Detail flower leaves.
Rose leaves have uneven jagged edges. Try to convey this in the drawing. In addition, try to make some leaves overlap others. This will give the flower sketch extra volume.
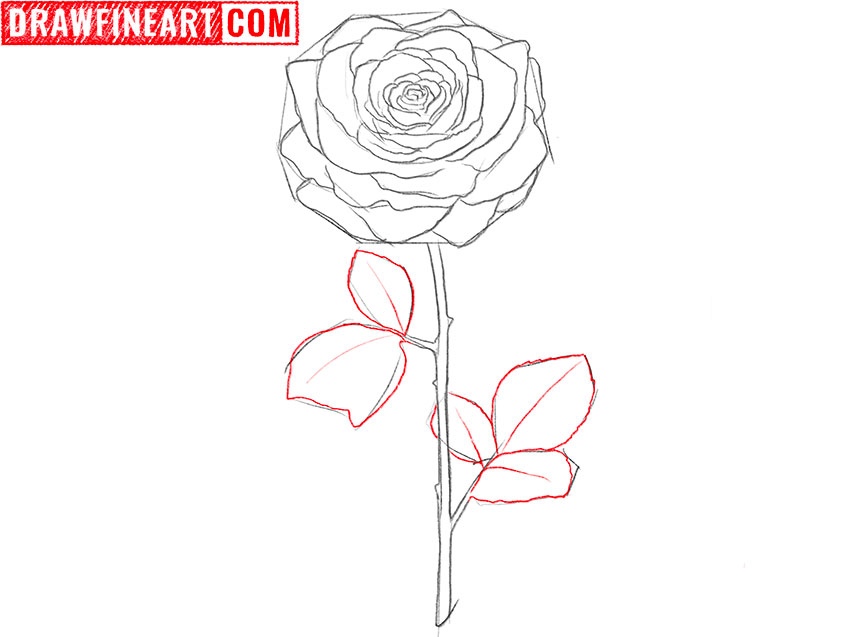
- Add some details.
Using light lines draw the veins on the leaves of the flower. This seemingly insignificant detail can give the whole artwork a more lively look.

- Erase all unnecessary lines from the rose.
Be careful not to erase the necessary lines. By erasing all unnecessary lines, you will see what else can be added or removed to make the composition look more complete.

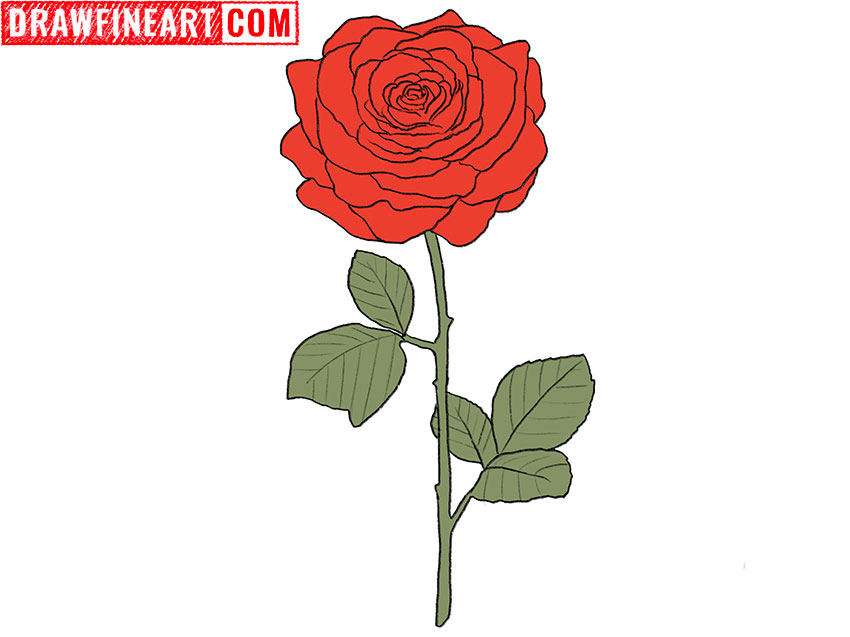
- Color your drawing of the rose.
We decided to use a combination of bright red and green for our flower. What are your favorite colors for roses? Color your flower in your favorite colors.


How to Draw a Rose Video Tutorial
The Rose drawing lesson completed
As we wrote above, the ability to draw flowers is a very useful skill for any artist. To continue the process of learning and honing your skills, you can try adding some details to your flower drawing:
- a vase with water for the rose
- some background and foreground
- a few more roses to make the composition more interesting
- fallen petals and leaves
In addition, of course, you can try to make an even more complex drawing, which will include a rose, such as the portrait with a rose in the hair, which we wrote about above.
Conclusion
Drawing such easy things as a rose may seem extremely simple, but in order to draw a beautiful rose, you need not only to make an effort, but also to have knowledge and experience.


